Intro
In the fast-paced world of WordPress website management, efficiency and organization are paramount. As a WordPress user, you understand the importance of streamlining your form management process to enhance user experiences and collect valuable data. That’s where QuillForms, our user-friendly form builder plugin, comes into play, providing a seamless way to create custom forms with ease.
We are thrilled to introduce our latest feature, “Import and Export Forms,” designed to empower you with even greater control over your form data. With this powerful tool, managing and transferring forms becomes a breeze. Now, you can effortlessly duplicate forms across multiple WordPress websites, share them with colleagues, or backup your precious form configurations. Embrace the convenience of seamless form migration, as you export forms from one website and import them into another, saving valuable time and effort.
In this comprehensive guide, we’ll walk you through the simple steps of using the “Import and Export Forms” feature. Discover how this cutting-edge capability enhances your form management, streamlines your workflow, and opens up new possibilities for your WordPress website. Say hello to increased productivity and data accessibility, and unlock the full potential of this game-changing addition to QuillForms. Let’s dive in and explore the world of effortless form management with “Import and Export Forms.”
How to Export Forms in QuillForms
- Open the QuillForms dashboard.
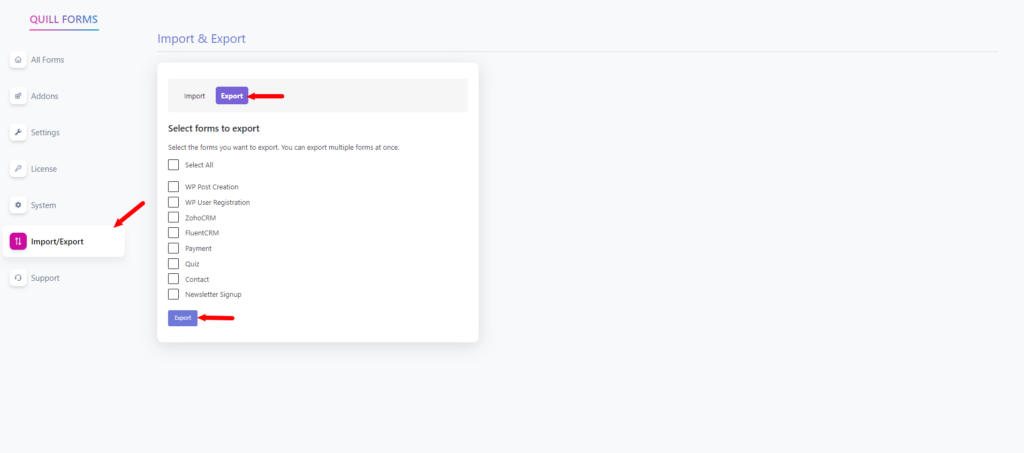
- Look for the “Import/Export” tab and click on it.
- In the “Export” tab, you’ll see a list of forms that you can export.
- Select the forms that you want to export by checking the corresponding checkboxes next to each form.
- After selecting the forms, find and click the “Export” button.
- The selected forms will now be exported and saved to your device or computer.

After following the steps mentioned above, QuillForms will export the selected forms as JSON files. These JSON files can be easily saved and used for various purposes, such as creating backups or transferring the forms to other WordPress sites that have QuillForms installed. JSON files are a popular and widely supported format for data interchange, ensuring compatibility and ease of use. With this simple export process, managing and moving your forms becomes more convenient within the QuillForms plugin for WordPress.
How to Import Forms in QuillForms
- Access the QuillForms dashboard.
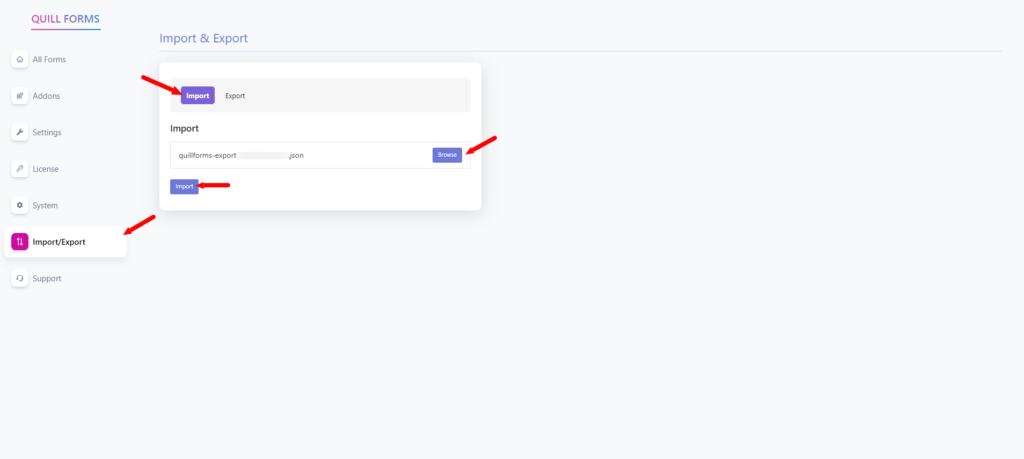
- Navigate to the “Import/Export” section.
- Choose the “Import” tab within the “Import/Export” section.
- Now, click on the “Browse” or “Choose File” button to open the file selection dialog.
- Locate the JSON file containing the form(s) you want to import. Ensure the file is in the correct JSON format compatible with QuillForms.
- Select the JSON file from your computer using the file selection dialog.
- Once the file is selected, click the “Import” button to start the import process.

After following the aforementioned steps, QuillForms will import the selected forms from the JSON file you uploaded. When importing, ensure that the JSON file contains the forms in the correct format compatible with QuillForms. Using the “Browse” or “Choose File” button, you can easily locate and select the JSON file from your computer. Once the import process is initiated by clicking the “Import” button, QuillForms will process the file and add the forms to your QuillForms dashboard. It’s essential to review the imported forms and update any necessary settings or configurations to ensure a seamless integration with your WordPress website. With QuillForms, managing and transferring forms between WordPress sites becomes hassle-free with the JSON file format.


